
As a new cohort of prospective TLs begins at CSU, I thought it would be useful to provide a hands on guide to blogs and blogging.
*This is a long blog post – upon reflection, there is enough content here for two or three posts! To make it easier to refer to, here is a printable version of the content of this post which I thought might be handy :).
Blog is the shortened form of ‘web log’ and so a blog can relate to any topic imaginable. This page explores the purposes of blogging and the process of setting up a blog for professional learning and reflection. It will be relevant for any professional but has been particularly written with educators in mind. Welcome to the wonderful world of blogging!
 Photo by Matthew Sleeper on Unsplash
Students at CSU have access to Thinkspace, which is where this blog is hosted. It is a blogging platform powered by WordPress. Thinkspace provides all staff and students with an online publishing environment that is supported and well resourced with a range of tools and resources to help beginning bloggers find their way.
Setting up your blog
There are many options available to users when setting up a blog. If you are setting up a blog as part of your assessment for Uni (and even if you are not) here are some things that you need to keep in mind when choosing the style, layout and design of your blog.
*Activate comments on your blog. This is ESSENTIAL if you are setting up your blog for assessment! Even if you are setting it up for personal, professional purposes, commenting is part of the blogging experience, and how you create community and gather feedback. Most blogging platforms enable you to moderate (check the comment) before publishing it if you are concerned that someone may leave an inappropriate comment (rare, but it does happen ☹).
*Sharing your identity is a personal choice. For a professional blog, a pseudonym may block connections being made (people will not know who is sharing all the great content and will be less likely to get in touch with you). However, there are many reasons why people may choose not to use their own image and/or name online, and only you can make the choice.
*There is a difference between Posts and Pages. Posts are time ordered entries, which readers can scroll through, presented in order from most recent to least recent. Posts are what blogs are generally formed of. Pages are stand-alone entries that are usually connected to form a website. Here is a great explanation of the difference between the two with examples from WordPress.
*When choosing your blog template, choose one that has a wide content bar which will give you plenty of space for images and tables. Some themes or templates have very narrow, newspaper like columns for your content, which may suit some bloggers, but which will make including multimedia, images, tables, diagrams etc. much more awkward (hint: use the affordances of the blog to include information in different forms – no one likes to read long blocks of text on a screen!). Once you’ve started, if you don’t like what you’ve chosen, don’t worry. In most cases you can change the template or theme and your content will be reformatted to fit the new look.
*Another thing to preview when deciding on your blog template or theme is the menu style. Some offer only a static menu, while others offer a fly-out or drop-down option. Fly-out or drop-down menus make it much easier to organise your pages, as you can have main pages and sub-pages (known as Parent and Child pages). Make sure your menu is easy to see and use – it is how your readers will navigate your blog. If it is too much trouble, most won’t bother and will go somewhere else!
*Table editing can be tricky in blogs. In many cases the built-in table option is clunky and may look ugly. If you find that this is the case (or if there is no table editing option at all) a good tip is to create the table in Word or PowerPoint (I like PowerPoint best). If you use Word, simply screenshot the table. If you use PowerPoint, choose Save As and then from the drop down for file-type, choose .jpg or .png (image files). It will ask you if you want to save just the current slide as an image or all of the slides. I prefer PowerPoint because you can make the table quite large and saving the table as an image rather than taking a screen shot usually creates a clearer picture. You can always scale an image down once you insert it in your blog but dragging a smaller image to make it larger usually results in loss of clarity. Test and see!
*When initially setting up a blog, give it a meaningful name that relates to the content. Try to find a name that describes what your blog is about (so that people know whether they might be interested from the web address) but is not too narrow (so that you can continue to maintain the same blog even if your professional interests morph and change. For example, this blog, www.linkinglearning.com.au has seen me through my role as an educator, librarian, PhD student and now University lecturer – it is always about learning, but what I am learning and how often changes, so my blog changes with me!
Designing and creating blog content
Every blog has a ‘tone’, and the content and design of the blog should reflect that tone. As this blog is being written for professionals who are using their blog for reflection and professional networking and learning, the advice that follows will direct readers towards creating a blog that is professional in tone.
It is good to keep in mind general web design principles as well as principles related specifically to blogging. At all times when making design and content decisions, keep in mind that the site is part of your professional digital identity. It is important that you convey your personality and personal style, because this is what makes a site authentic, but find the balance between ‘you’ and ‘professional you’.
This mind map, created by Dr. Mandy Lupton, gives a great summary of the elements of web and blog design that you should keep in mind.
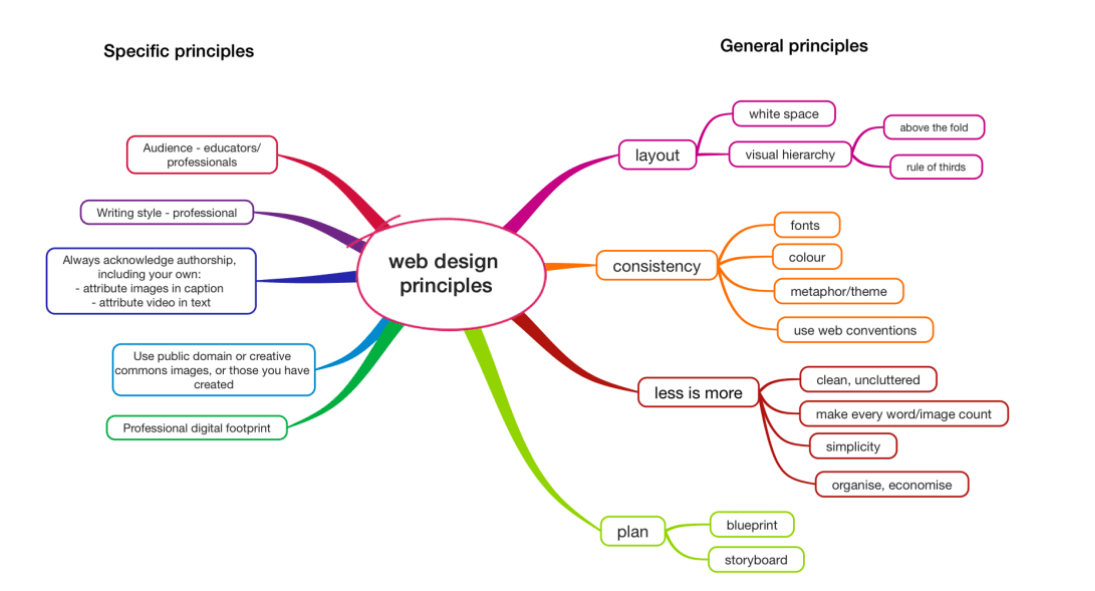
This Pinterest board contains links to a range of sites that explain the key web design principles referred to in the mindmap above.
General Design Tips
One of the first things you need to consider is colour scheme. When choosing, these are tips to keep in mind:
*Choose two or three colours (no more than this) to underpin your blog
*Consider your readers when making colour choices (readers may be colour blind, may have visual impairment, may just not like reading a lot of yellow text on black background!)
*Consider using a colour scheme generator
Images
When publishing a blog on the open web, no ‘education exceptions’ or ‘fair use’ applies. Even though you may be a student, and your work may be created as part of your learning, your blog is public and open to the world. Therefore, you must only use images that are:
* created by you, or
* licensed through creative commons or
* in the public domain,
* ‘stock’ images you have purchased or are freely provided by your blogging tool
* ones you have written permission from the copyright holder to use.
You must also credit each image regardless of their licence (see information on citing and referencing below).
DO NOT search Google Images and use whatever you find. Freely available to view online does not mean freely available to republish.
Three excellent sites for images and icons are: Pixabay (public domain photos and image files), Unsplash (public domain photos) and The Noun Project (creative commons licensed icons).
You are always free to embed anything into your blog if the content item provides an embed code (e.g. YouTube videos). Embedding is just a fancy form of hyperlink, as the content remains on the original host page. Therefore, embedding does not infringe on copyright.
Further information is available in these printable PDFs (copyright and creative commons), and I have included the infographics at the bottom of this post.
Citing and referencing
What referencing conventions should I use?
In general, when using a web-based format and are referencing material available on the open web you should hyperlink the in-text reference and include the reference in a reference list. If you are citing material which is not available on the open web (for example if you are citing an article only available through a library journal database) you should still use an in-text citation and provide a reference list at the end of the post where the reference has been made, but a hyperlink is not necessary. CSU students in the School of Communications and Information Services should use APA referencing. Here is the CSU referencing guide which provides in-depth referencing information.
Using images and video
When using images and video on your blog, you need to make sure that you have the necessary permissions and that you provide attribution. If you have created your own image or video, you must state that it has been created by you. You can say something like ‘image/video created by author’. If an image doesn’t have an attribution it may be assumed that it has been republished inappropriately.
In your blog, all content must be referenced and cited!
If you are using an image as a banner, attribute the image on the Home page or About page of your blog if it is not possible to caption a banner image. Another way to ensure all images are cited appropriately is to use all Public Domain images and then make a blanket statement on the Home or About page, stating that ‘All images are from the Public Domain unless otherwise stated’. Then, if you happen to use a creative commons image or one you have received permission to use, you need only caption these images.
Referencing images: reference in the image caption (you don’t need to include reference in the reference list)
Referencing video: reference and hyperlink to the source in the text immediately before you embed the video e.g. ‘In this video Sir Ken Robinson discusses creativity’ (you don’t need to include a reference to the video in a reference list).
Writing your blog posts
What writing style should you use?
The writing style of a blog is determined by its purpose and audience. When writing for university, you should write in a professional, reflective and scholarly style. What does this mean?
Professional: Your colleagues and other scholars and professionals are your reading audience. Imagine giving a professional development session at a staff meeting, or a conference presentation. That is the sort of tone and style you should adopt. You don’t need to use a highly formal academic style. A professional tone is friendly but not overly familiar. This blog is written in a professional style. I imagine that I am speaking with others who are interested in what I am interested in, but I remember that I am not speaking with family or close friends, so I write clearly, and don’t use any slang or ‘in-jokes’, and I don’t make assumptions about my readers.
Reflective: Your feelings and opinions about teaching and learning are encouraged. You are an experienced educator, and you should use your experience to create a professional conversation. People will find your blog more engaging (and are therefore more likely to read and respond) if you share professional anecdotes, opinions and what you have learnt.
Scholarly: Reference and cite all sources (hyperlink all open access sources). Write strong, clear and succinct topic sentences. Support the topic sentence with 2-4 sentences that provide evidence for the topic sentence. Each paragraph should have only one main idea. Start a new paragraph when you introduce a new idea.
Headings and Subheadings: Consider using headings and subheadings in your blog posts to direct the reader and to break up the text. It is easier to read text that is broken into smaller sections when reading on screen.
Also remember that professional information can be communicated in many forms thanks to the affordances of the blog format. Use videos, images, diagrams, tables, infographics, mindmaps or any other appropriate content to break up text and to effectively explain complex ideas.
Proofreading: Make sure you read all of your writing aloud. The world is reading your work (not just your university lecturer) and while no one is perfect, typos and sloppily constructed text is not professional and reflects poorly.
Further copyright information
